
Remote debugging is a pretty sweet addition to your dev toolbelt, but sadly the amount of documentation out there on how to debug django apps running on EC2 is very scarce. Sight no more! This Karumi contribution is here to throw some light on this matter!
Pycharm is by far the best IDE to develop django apps, offering a very nice set of features to do remote debugging. It’s worth every dollar you spend on it.
This guide assumes that you have the keys to connect to your EC2 instance and that you have a django application deployed directly in EC2 of through Amazon Beanstalk. If you are using autoscaling and have more than one instance, you might need to repeat the request until you hit the instance you chose as the remote interpreter. You can check the official AWS documentation.
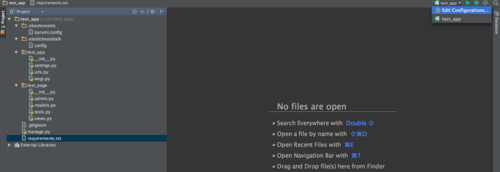
This is how awesome django app looks like:

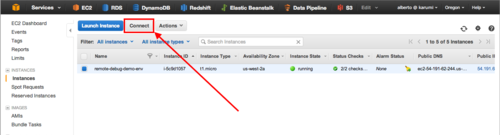
1 - Get the public IP of your EC2 instance.
Just go to the EC2 panel, select Instances, click on the appropriate instance and click Connect (yeah, the IP shows up at the bottom but as we will be using this later, we rather do it this way).
You will then see this window:
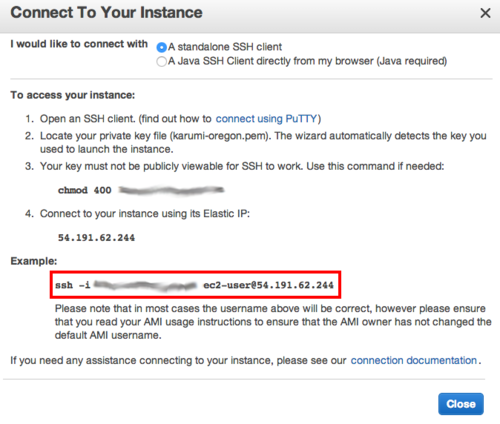
Make sure to keep this window open as we will be copying and pasting stuff from it. Also, make sure to connect to your EC2 instance following the following instructions.
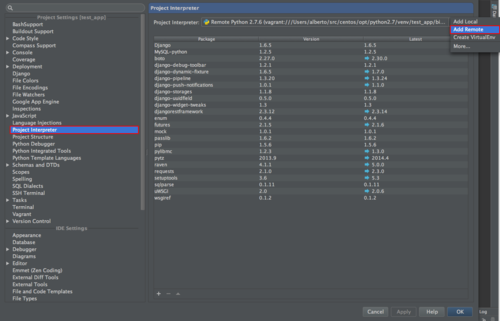
2 - Setup the remote python interpreter from your EC2 instance.
Just go to your project’s Preferences and select Python Interpreters, click on the cog in the upper right corner and select Add Remote.
Go ahead and fill up the form, it’s pretty straightforward.
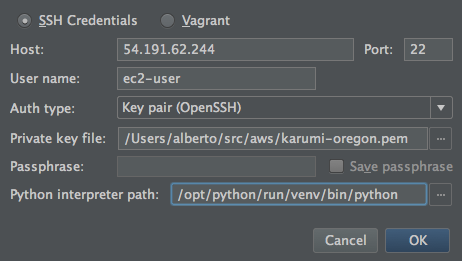
The only “special” thing here is the python interpreter path. You can figure this out for yourself by connecting to your instance, loading the virtualenv and asking for the python interpreter path, just like this:

Now pycharm will start setting up the helpers on the remote machine. This might take a while. By the end of the process you should have the interpreter setup in your pycharm.
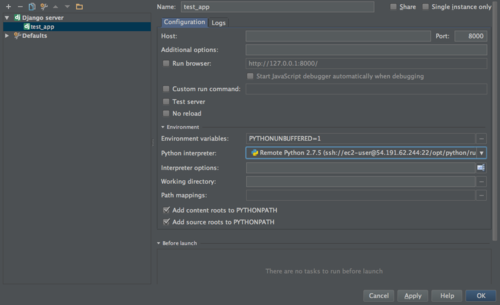
3 - Edit the Run/Debug configurations.
Click Edit Configurations from the dropdown menu in the upper-right corner:
We will need to configure some stuff here!
First, make sure that the just configured python interpreter is selected.
Next, we need to pass along all the environment variables that Amazon passes to our django code. We can check which ones they are by executing
$ cat /opt/python/current/env
in the EC2 instance.
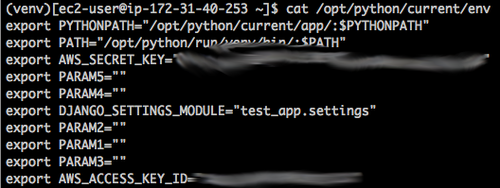
As this is a very simple app, you will only need the settings module. However, if you use RDS, S3 or similar services you might need to pass many more environment variables (even the AWS access and secret to interact with Amazon services though boto). You don’t need to pass PYTHONPATH nor PATH.
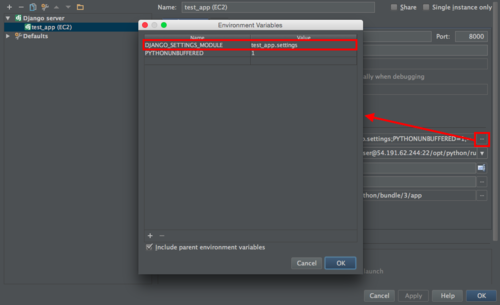
Now go to pycharm and click on the Environment Variables … icon and add the names and the values there. This is how it will look like:
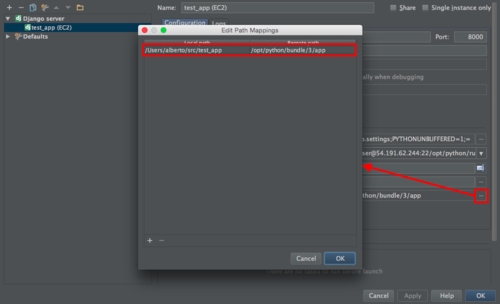
Additionally, we have to add the mapping path so pycharm is able to associate files in the EC2 instance with correspondent files in our local machine. To figure out where the code is lacted in the EC2 instance we just do
$ ls -la /opt/python/current
This is the output in our case:

This folder contains an app folder that contains the django app. So the mapping path would be something like this:
/your/path/to/your/django/application <-> /opt/python/bundle/3/app
Now go to pycharm and click on the Path Mappings … icon. This is how it will look like:
Finally set the host as 0.0.0.0 so django is able to listen all IPs and the port to 8000 (or any port that you are currently not using). The reason is that pycharm will start a development server using this data, and we want that server to listen to all requests coming through the port 8000.
You can click now OK and save the configuration, but we are not done yet, one last step to go!
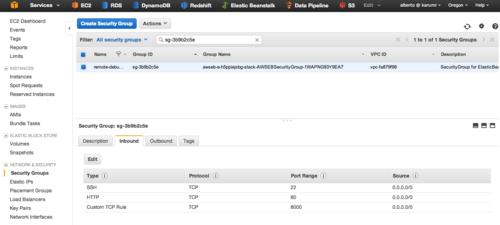
4 - Open port 8000 in your EC2’s security group.
This is the last step! Just go to your instance’s security group (you can access to it directly from the EC2 instance details panel) and open port 8000.
5 - Enjoy!
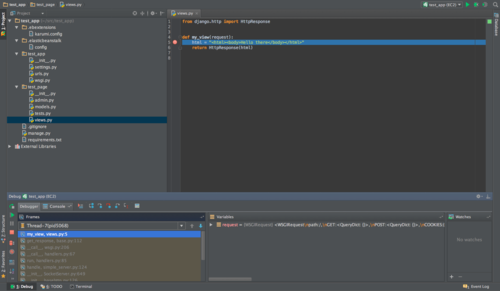
Now you can click on the Debug icon in pycharm and you will see something like this in the debug console:

Cool! Now let’s set a breakpoint in the only view of this application. Go to the browser and open http://your-site-env.elasticbeanstalk.com:8000/. If everything went well, you will see something like this in pycharm:
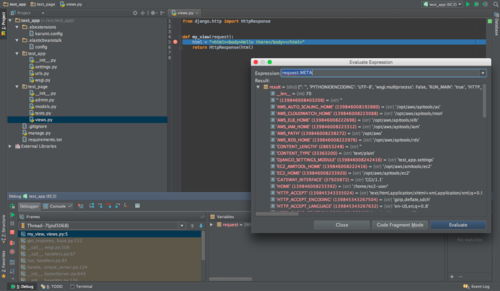
Wohooo!!! From here on it’s just a regular debugging session where you can step over, evaluate, etc.
And that’s it! We truly hope this guide will be of your help.
- Davide & Alberto on behalf of all Karumies.